Thermostat

Description
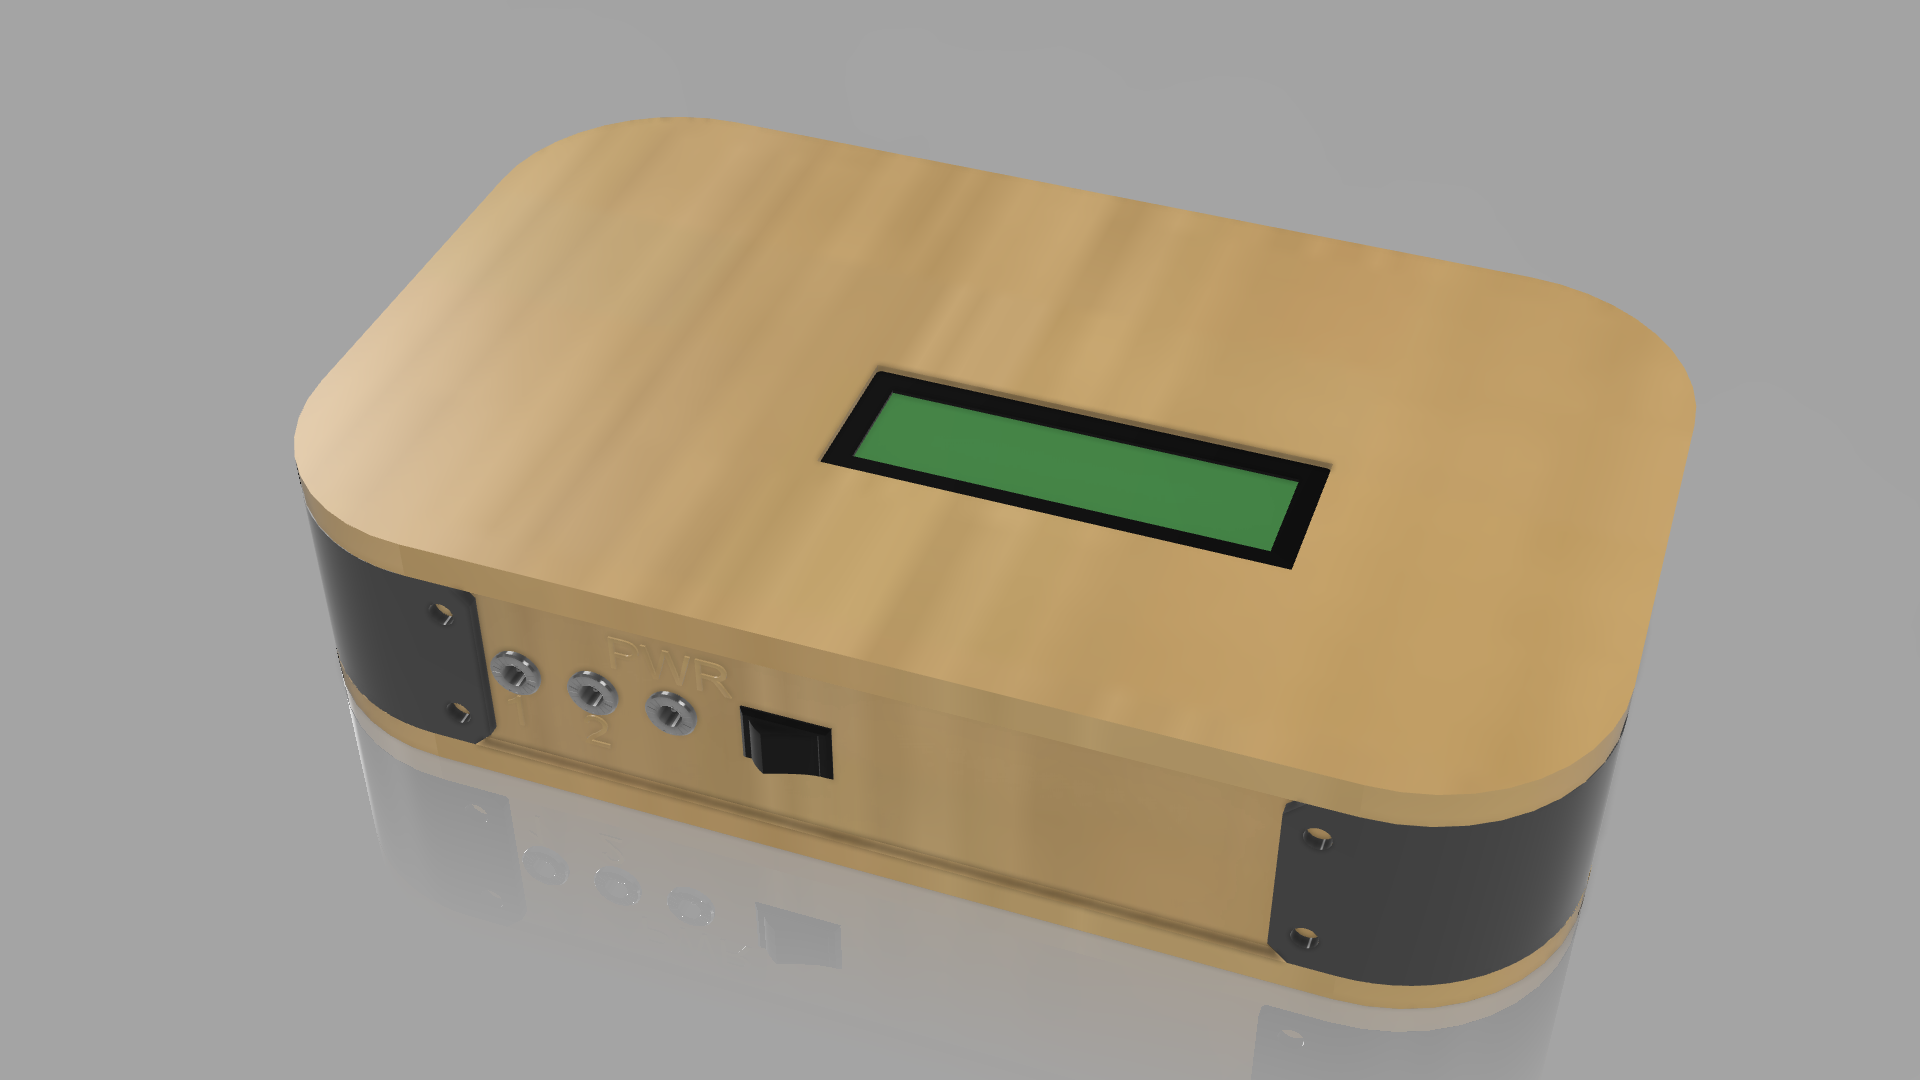
The wine cellar thermostat is the perfect device to keep constant temperature. Equipped with two thermometers and two fans, the thermostat can adjust the inside temperature by using the outside calories.

Context
The majority of a wine bottle life is its storage.
But this has to happen in a certain environment.
The temperature of the seller is one of the most important factors for an optimum storage.
As explained before, wine doesn’t like temperature peaks.
But where I live, the temperatures can klimb up to 35°C at day and reach almost 10°C at night.
Steps
First what do we need?
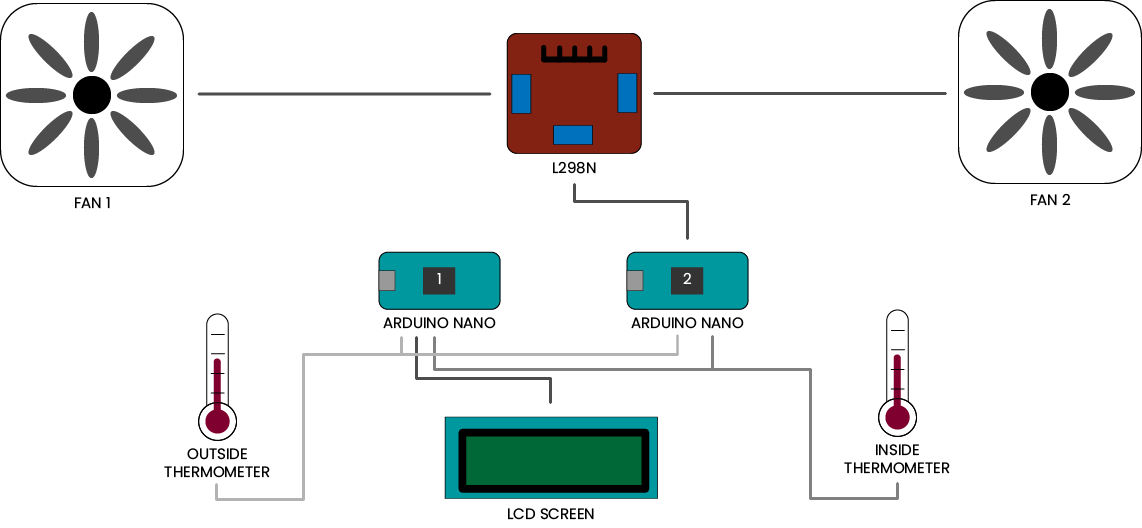
We want to read two different temperatures and display them on an LCD.
We need to create an air flow through the cellar thanks to a couple of fans.
To collect, write and manage the data, we obviously need a microcontroller.
In my case I will be using tow Arduino Nano.
How does it works ?
Since an Arduino nano hasn’t got enough digital pins,
I had to separate the program on tow Arduino.
The first one is only collecting temperature data and displaying them on the LCD.
The second one is also collecting temperature data in order to compare the outside temperature to the inside.
If the outside is cooler then the inside then the fans activate.
But if the outside temperature is below 8°C, then the system won't activate.
To create the air flow, I’m using 12V DC fans.
In order to control them I need an L298N H-bridge DC controller.
To make things easier, I’m using a module which already has tow 12V outlets for the brushed motors, a 12V input.
It also has 6 digital 5V pins to control each motor duty cycle.
If your interested, here is the link.

For this project, I spend a lot of time soldering since I had two arduino boards, and a few sensors.
Code
As explained before, the program is split on to two Arduino. So here is the code and the explanation for the first one.
First code
                #include <LiquidCrystal.h>

                LiquidCrystal lcd(12, 11, 5, 4, 3, 2);

                int Thermistor_1 = 1;
                int Thermistor_2 = 2;
                float Temp_in;
                float Temp_out;
                int BP = 8;
                int etat_BP;
                int led_1 = 6;
                int lcd_led = 7;
                int n;

                int contrast = 10;

                float R1 = 10000;
                float logR2, R2;
                float c1 = 1.009249522e-03, c2 = 2.378405444e-04, c3 = 2.019202697e-07;

                void setup() {
                  Serial.begin(9600);
                  pinMode(Thermistor_1, INPUT);
                  pinMode(Thermistor_2, INPUT);
                  pinMode(led_1, OUTPUT);
                  pinMode(BP, INPUT);
                  pinMode(lcd_led, OUTPUT);
                  pinMode(contrast, OUTPUT);
                  lcd.begin(16, 2);
                  n = 0;

                  analogWrite (contrast, 80); // LCD contrast (set the value as you wish)
                }

                void loop() {

                  if (n <= 180) {
                    analogWrite(led_1, n);
                    n = n + 3;
                  }
                  else {
                    n = 0;
                  }

                  etat_BP = digitalRead(BP);
                  if (etat_BP == 1) {  // getting the lcd out of sleeping mode

                    n = 0;
                    while (n <= 2000) {  // start a timer
                      analogWrite (led_1, 255);
                      digitalWrite(lcd_led, HIGH);
                      Temp_in = analogRead(Thermistor_1);
                      R2 = R1 * (1023.0 / (float)Temp_in - 1.0);
                      logR2 = log(R2);
                      Temp_in = (1.0 / (c1 + c2 * logR2 + c3 * logR2 * logR2 * logR2));
                      Temp_in = Temp_in - 273.15;

                      Temp_out = analogRead(Thermistor_2);
                      R2 = R1 * (1023.0 / (float)Temp_out - 1.0);
                      logR2 = log(R2);
                      Temp_out = (1.0 / (c1 + c2 * logR2 + c3 * logR2 * logR2 * logR2));
                      Temp_out = Temp_out - 273.15;

                      lcd.setCursor(0, 0);
                      lcd.print("In:");
                      lcd.print(Temp_in);
                      lcd.print(" C");

                      lcd.setCursor(0, 1);
                      lcd.print("Out:");
                      lcd.print(Temp_out);
                      lcd.print(" C");

                      n = n + 1; // add one at eache iteration (for the timer)
                    }
                    n = 0;
                  }
                  else {
                    digitalWrite(lcd_led, LOW);
                  }
                  delay(100);
                }
This part of the code is only here to make the main bouton LED blink with a light variation.
            if (n <= 180) {
            analogWrite(led_1, n);
            n = n + 3;
            }
            else {
            n = 0;
            }
We don’t want the LCD screen to be powered up all the time. There for we are entering in a “if” loop only if we hit the bouton. In this “if” loop we start a timer thanks to a “while” loop in order to light up the screen only a certain amount of time.
                etat_BP = digitalRead(BP);
                if (etat_BP == 1) {

                  n = 0;
                  while (n <= 2000) {
A thermistor is a resistor which changes value by being heated or cooled. That’s why in the below peace of code we are reading a raw resistance value and converting it into a temperature in °C. We first read the inside temperature and then the outside temperature.
                Temp_in = analogRead(Thermistor_1);
                R2 = R1 * (1023.0 / (float)Temp_in - 1.0);
                logR2 = log(R2);
                Temp_in = (1.0 / (c1 + c2 * logR2 + c3 * logR2 * logR2 * logR2));
                Temp_in = Temp_in - 273.15;
Now that we have read the temperatures, we display them on the LCD.
                lcd.setCursor(0, 0);
                lcd.print("In:");
                lcd.print(Temp_in);
                lcd.print(" C");
Second code
The second code is reading the temperatures, comparing them and controlling the fans.
                int Bin1 = 5;  //if Bin1 is high, the motor spins in one way
                int Bin2 = 4;  //if Bin2 is high, the motor spins in the other way
                int Ain1 = 7;
                int Ain2 = 6;

                int EnB = 3;  // pin to adjust the B motor speed
                int EnA = 8;

                int Thermistor_1 = 0;  // inside thermistor
                int Thermistor_2 = 1;  // outside thermistor
                float Temp_in;
                float Temp_out;

                float R1 = 10000;
                float logR2, R2;
                float c1 = 1.009249522e-03, c2 = 2.378405444e-04, c3 = 2.019202697e-07;

                void setup() {
                  Serial.begin(9600);
                  pinMode(Thermistor_1, INPUT);
                  pinMode(Thermistor_2, INPUT);

                }

                void loop() {
                  // ----- temperature reading -----
                  Temp_in = analogRead(Thermistor_1);
                  R2 = R1 * (1023.0 / (float)Temp_in - 1.0);
                  logR2 = log(R2);
                  Temp_in = (1.0 / (c1 + c2 * logR2 + c3 * logR2 * logR2 * logR2));
                  Temp_in = Temp_in - 273.15;

                  Temp_out = analogRead(Thermistor_2);
                  R2 = R1 * (1023.0 / (float)Temp_out - 1.0);
                  logR2 = log(R2);
                  Temp_out = (1.0 / (c1 + c2 * logR2 + c3 * logR2 * logR2 * logR2));
                  Temp_out = Temp_out - 273.15;

                  // ----- comparing the temperatures -----
                  if (Temp_out >= 8){
                    if (Temp_out < Temp_in){

                      //Fan 1
                      digitalWrite(Ain1, HIGH);
                      digitalWrite(Ain2, LOW);
                      analogWrite(EnA, 255);

                      //Fan 2
                      digitalWrite(Bin1, LOW);
                      digitalWrite(Bin2, HIGH);
                      analogWrite(EnB, 255);

                    }
                    else{
                      //Fan 1
                      digitalWrite(Ain1, HIGH);
                      digitalWrite(Ain2, LOW);
                      analogWrite(EnA, 0);

                      //Fan 2
                      digitalWrite(Bin1, LOW);
                      digitalWrite(Bin2, HIGH);
                      analogWrite(EnB, 0);
                    }

                  }
                }
Here we have two “if” loops. The first one is to make sure that the outside temperature is over 8°C. And we are entering the second loop only if the outside temperature is less then the inside temperature.
            if (Temp_out >= 8){
                if (Temp_out < Temp_in){

                  //Fan 1
                  digitalWrite(Ain1, HIGH);
                  digitalWrite(Ain2, LOW);
                  analogWrite(EnA, 255);

                  //Fan 2
                  digitalWrite(Bin1, LOW);
                  digitalWrite(Bin2, HIGH);
                  analogWrite(EnB, 255);

                }
If the previous loop isn’t active, we need to turn the fans off thanks to the below code.
              else{
                //Fan 1
                digitalWrite(Ain1, HIGH);
                digitalWrite(Ain2, LOW);
                analogWrite(EnA, 0);

                //Fan 2
                digitalWrite(Bin1, LOW);
                digitalWrite(Bin2, HIGH);
                analogWrite(EnB, 0);
              }
This command is to communicate with the L298N.
If you set the Ain1 value to high and the Ain2 value to low, the motor will spin in one direction.
And if you reverse the previous values, the motor will spin the other way.
To adjust the speed you can set a value between 0 and 255 in the analogWrite() function.
              digitalWrite(Ain1, HIGH);
              digitalWrite(Ain2, LOW);
              analogWrite(EnA, 0);
Results
No results for now